
HOW TO CONVERT A DISK FROM MBR TO GPT ON WINDOWS 10
HOW TO CONVERT A DISK FROM MBR TO GPT ON WINDOWS 10
While you've been able to do this process in the past, it required hours of work. Previously, you needed to back up your data, repartition the disk using GPT, reinstall the OS, and then restore the data.

Starting with the Creators Update, the MBR2GPT tool enables you to change the partition style in minutes, and more importantly, in a non-destructive process. The conversion is done by adding the GPT components to an MBR disk without modifying the existing partition and file system, which allows your data to remain unchanged.
The ideal way to switch is to configure Windows 10 and use UEFI from the beginning. However, if you're already running Windows 10, you're upgrading from a previous version to Windows 10, or you've already deployed the OS in BIOS mode on devices with support UEFI, there are two things you need to do:
- First, you need to convert the disk using MBR to GPT-style partition, which is the main requirement to run Windows 10 in UEFI mode.
- Secondly, you must change your motherboard firmware settings to make the switch from BIOS to UEFI mode.
Checking disk partition type
Use the Windows key + X keyboard shortcut to open the Power User menu and click on Disk Management.
-
Right-click the disk with the Windows 10 installation and select Properties
 3.Click on the Volumes tab and look at "Partition style". If it reads GUID Partition Table (GPT), the disk doesn't need to be converted, but if you see the Master Boot Record (MBR) label, then you can use the conversion tool.

In addition, make sure to check your PC manufacturer's support website to see if the device includes support of UEFI mode before using the conversion tool.
Converting disk to GPT partition style


In order to convert the disk from MBR to GPT, you need to start your
computer in Windows PE (Preinstallation Environment), and then do the
following.
Warning: Although this is a non-destructive process, you should always keep a full backup of your computer and data in case something goes wrong.
- Open Settings.
- Click on Update & security.
- Click on Recovery.
-
Under "Advanced startup," click the Restart now button.

5.Click on Troubleshoot.
6.Click on Advanced options.
7.Click on Command Prompt to boot into Windows PE

8.Click on your account and login with your credentials
9.Type the following command to validate and make sure the disk meets the requirements and press ENTER
mbr2gpt /validate
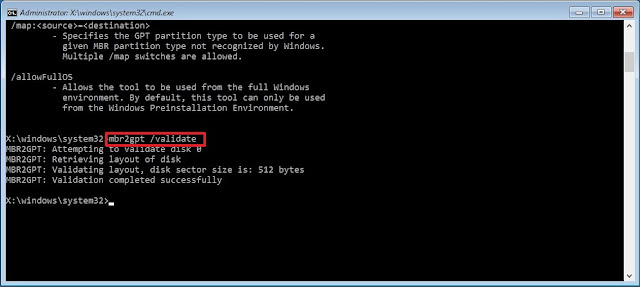
If everything checks out successfully, you can continue with the next step, but it's also possible that you'll get an error, in case the disk didn't meet the requirements. For example, if the drive was already using a GPT partition style.
Quick Tip: "MBR2GPT.exe" is located inside the "System32" folder inside the "Windows" folder, and if you want to see all the available options included with this tool, you can use thembr2gpt /?command.

10.Type the following command to convert the disk from MBR to GPT and press Enter:
mbr2gpt /convert

As you execute the commands, the tool will validate the disk. The partition will be reconfigured to include an EFI system partition (ESP) as needed. Then the UEFI boot files and GPT components will be installed in the new partition. The boot configuration data (BCD) will be updated, and finally, the drive letter is restored.
The tool was designed to run in the Windows PE using Command Prompt, but it's also possible to use it when Windows 10 desktop is fully loaded. This is not recommended, though, because you may encounter some problems with other applications running on the system.
In the case you want to use the tool while Windows 10 is fully loaded, you'll need to append the /allowFullOS switch after each command mentioned above. For example, you can use this commandmbr2gpt /validate /allowFullOSto validate the disk. Otherwise, you won't be able to use the tool.

MBR2GPT return codes
If the conversion was applied successfully, you should see a return code of 0. If the process fails, you'll receive a different return error code.
Actually, you can get eleven different return codes 1 through 10, and code 100, each one indicating a particular problem during the conversion process.
Here's what those codes mean:


| Return Code | Description |
|---|---|
| 1 | User canceled the conversion. |
| 2 | Internal error. |
| 3 | Initialization error. |
| 4 | Invalid command-line parameters. |
| 5 | Error on the geometry and layout of the selected disk. |
| 6 | One or more volumes on the disk is encrypted. |
| 7 | Geometry and layout of the disk don't meet requirements. |
| 8 | Error while creating the EFI system partition. |
| 9 | Error installing boot files. |
| 10 | Error while applying GPT layout. |
| 100 | Successful conversion, but some boot configuration data didn't restore. |


No comments